Showing posts with label doll. Show all posts

Friday, May 16, 2014

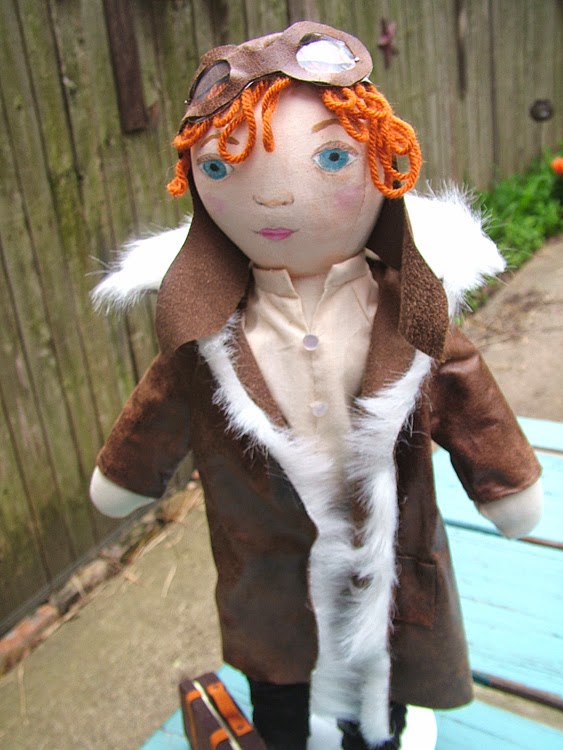
amelia earhart doll


This is a fun project for anyone who has ever wanted to engage in some doll making, but without making the doll completely from scratch. For me the, the most fun part about making a doll is to create clothes and accessories that will make the doll unique. Making the body is not something I have proven to be that talented at. So, lucky for me, I ran across this 18 inch cotton doll at the craft store many months ago. It cost $8. The doll is not particularly attractive but has bendable fabric limbs and happens to be the same size as the American Girl Doll, which wound up coming in handy because you can purchase clothing items that you don't want to sew. Aside from the actual American Girl store, lots of places sell knock off 18 inch doll clothing including Joann Fabric and Toys R Us.
First, decide what kind of doll you want to make. If it is a literary or historical figure you should pick some identifying items of clothing and determine what color hair and eyes the doll will need to have. The clothes that Amelia is wearing were sewn were from Simplicity Pattern 5733, which contains all the clothes patterns you would need for virtually any doll including a skirt, a blouse, a robe, a long coat, a short jacket and pants.
What our doll is wearing:
  • white blouse sewn from pattern with pearl buttons at neck
  • brown suede pants sewn from pattern
  • black scrunchy boots purhased in 18 inch doll section at Joann Fabric
  • Long jacket sewn from pattern using Pleather. I used only one layer of the jacket and instead of making a liner glued on long strips of fake fur along the collar and inside. The coat does not button or zip, it is just open.  
  • Suitcase made from an empty Altoid tin. I covered the outside in brown felt and put purple satin on the inside. I made some medals out of shrinky dinks to represent her French Legion of Honor and her Distinguished Flying Cross medal. 
  • Goggles- wait until the face is done so that you know how far the eyes are spaced. Then cut simple goggles out of Pleather, twice. Sandwich some clear plastic (i used transparency from a stationary shop) in between the Pleather and use Superglue.
  • Hat - there is a really great aviator hat tutorial here at thedeviantart site.
  • hair- I used orange yarn
  • face paint- acrylic paint.
After I dressed the doll in her clothes I ran into the dilemna of how to make her face and hair. For this I turned to my co-blogger Corinne. She is a talented painter and has some experience with dollmaking so she took over and made the face and hair. She painted a circle on the face using gesso then drew the features in pencil, then filled them in with acrylic paint. She made the hair curly by gluing the yarn in loops under the helmet. It might be possible to find orange yarn that is already curly but I had not found any so this worked great.
We really enjoyed making this doll, as we both are big Amelia Earhart fans. You may want to make a similar one or make one in homage to your own hero or heroine.


Tuesday, February 18, 2014

A Box of Pirates

Pin It


If you read this blog you will know that Corinne and I often make little toys and games. We also like to make cute containers to hold these toys so that they make nice gifts and also can be stored neatly. Recently, I repurposed an old cardboard pencil box using felt scraps and the Jolly Roger flag. This box is nice enough on its own for school supplies and as a keepsake box for your favorite wanna-be pirate, but I decided to make a little scene to fit inside and make it even more fun.This is a pretty easy project but it has a few parts so I will lay them out separately here. 
The pirates:  Use my tutorial for Ping Pong Ball Fairy Puppets and make
 pirates instead of fairies. I dressed mine in a variety of shabby fabric and felt scraps and added some messy hair and facial hair and a bandana for one and an eye patch for the other.  I did not want the pirates to be puppets but to be able to stand on their own. So, when everything is done you will want to insert a wooden craft clothespin under the clothing and up into the ping pong ball head where the finger holes are. You can then glue the clothespin into a wooden clothespin stand (they sell these in bags at craft stores) and your little figures will stand up nicely. I should also add that for some reason I gave my dark-haired pirate vertical stripes. It would look way more pirate-y if the stripes were to go across his outfit. But hopefully you can tell they are pirates.

Treasure Chest

I used a mini Altoids tin, some leather scraps, felt, and a little key and lock charm I got at a bead store. You could follow my example or come up with something different. If you don't have leather, felt will work fine. Glue the pieces on with craft glue. Inside the chest I glued in lots of beads and glitter and balls of tinfoil to represent the treasure.
The Trees

I made a banana tree and a coconut tree for my pirates. I painted craft sticks of different lengths brown then added felt leaves and either bananas or coconuts cut out from felt. I glued the craft sticks into a clothespin base so they will stand. I had to file them down a bit to get them to fit. I would also add that my banana tree is so tall it is a little off-balance and if I did it again I might make both trees shorter for better stability.
Swords 
The swords are probably the least successful part of my little play scene. You can do better! I used gold and silver polymer (Fimo) clay and shaped these little weapons and baked them.

More...  there is plenty of room in the box for additional accessories. I found a cute little bird and added that to the collection. Ideally you would give this to a child and help them make more stuff like more maps, more weapons, more pirates. A mermaid would be cute, too!


Pin It