Thursday, February 2, 2017

New Things


Pin It
So just updating what we have been up too lately. Sarah has been super busy teaching classes on mosaics, soap making and other cool crafts. She has also been making these beautiful mosaic pieces (soon to be for sale on Etsy!) You will want to rush to get those, they really are beautiful. We will update in another post with all the information to her shop, and link to her classes if you in the Chicago area you can join in.

 I have been taking a pottery class and making just tons of stuff! I took classes in college but more for figure sculpting, this is just free and whatever I can come up with and I love it! I am sharing all of that work on my blog Not Too Pink Here is just a few images of what I have been working on;
Above and below, some "Lady Head" vases. 

These 2 (maybe sort of weird?) brooches went to my mom.

This raining cloud mobile


And a work in progress mobile, starring these guys!

I am also taking this amazing illustration class I will post about over there as well, much to share!

Pin It

Friday, December 23, 2016

Walnut shell knitting basket ornament

Pin It
We used the walnut shell many times in our small crafts, one of our favorites,
was the knitting basket from this post

This would make a really cool, unique ornament for the knitter in your life, so we made new
Christmas baskets, with red and green yarns.

Thursday, December 22, 2016

Yet another easy small holiday ornament

Pin It
I love the kitschy awesomeness of the Yule Log, and even more so as a cake. 
Also known as Buche de Noel.

Tiny cuckoo clock ornament

Pin It
Here is just one more last minute ornament idea!

I absolutely love cuckoo clocks, and have been dying to get one for our house for years! 
I love all the hand-carved details in the house, the little woodland animals, the kitschy German landscapes
and of course, that fact that a birds comes out of a little door to say "cuckoo!".
So like many things I have yet to get, I will make a very tiny version for a dollhouse 
and wait patiently for the day, I get a real one in my own house!

Tuesday, December 20, 2016

It's not too late to make more gifts!

There are still a few days left to come up with some creative, quick handmade gifts this Christmas.
Here is just one example, one of our most popular Christmas gift ideas, tiny book charms!

Pin It

With the holidays approaching I am once again struggling to come up with some inexpensive, original gifts for my family. How about you?
 First order of business for me: a present for my mom. She has a home filled with festive dishes, Matryoshka dolls, quilts, tea sets and books. I try to make her a gift every year. My mom is rather obsessed with the Bloomsbury Group. She collects their various first editions, gives a dramatic slide show detailing their capers and love affairs and for many years even had a big picture of Virginia Woolf hanging in her sewing room. (If you would like to see the Virginia Woolf quilt she made it is on Tumblr) So it did not take much imagination to determine that I should make her something featuring her favorite tortured author. I decided that at the same time I could make my daughter something for her dollhouse.

Sunday, November 13, 2016

Matchbox Mayflower Diorama


Pin It

Thanksgiving is around  the corner, thought we would share this old favorite from a few years ago!
I gave this to my mother who hosted our Thanksgiving dinner that year!
------------------------------

It is November, and Thanksgiving is approaching! 
Here is a clever gift to share for the holidays: a matchbox diorama of the 
Mayflower voyage with a ship you can move around through the waves like it is sailing to the New World.

Monday, February 29, 2016

Superstar!


I am being featured this week on Cutoutandkeep.net as the "Crafty Superstar" !


So each day this week we will share one our tutorials! 
Go on over and check it out, today's post is Paper Mache Animals!


Pin It

Thursday, February 11, 2016

3 -D Matchbox Valentine Diorama's


Pin It

I've said it before, I love to make things with little matchboxes, so it should be no surprise I am still coming up with things to do with them!
I was just sort of making this little diorama for myself for fun, when my son saw it. He really surprised me how much he loved it! So I thought, I could hide it away and give it to him for Valentines Day.
 I had to make a second one for my daughter too!

My daughter is quite the little writer these days, so she got a little wolf typing away! 
Typing on a Robin's Egg Blue vintage typewriter of course! 

Here is how easy this was to make;
I just used a regular old small matchbox.  Instead of elaborate decorating I simply covered everything with a black sharpie marker in one coat. Very smelly, but provided quick and easy results!

I traced the background for size, and did a simple illustration in pencil, added color with watercolors,and went back over the pencils lines with black pen so they stood out. 
I used regular white glue to attach to the back.
To create a 3-D effect, I made 2 more layers, same technique, paper-pencil-watercolor-pen. I cut the image out, but left a tab to attach to the inside of the box, and colored over the tab with black sharpie so it does not show.
The top layer needs it's tab to be the thickness of the inside of the box, so that it stands on top. The tab of the layer below should be half the thickness, so it rests in the middle.
Fold all the layers inside the box, and your little diorama is ready for someone to love!
I kept it simple for the covers (as you can see above) and just glued another drawn image to the front.

Pin It

Friday, January 29, 2016

Hello!


Hello!


 Sarah and I are still here and we are still making things. We just have taken a bit of a break with family and work obligations.
We have missed sharing our ideas with the craft community, but we never stopped searching out and
gathering ideas, we just haven't had the regular time to create and share. 

So we have things to share and soon! We hope to hear from you too!
-Corinne

Pin It

Friday, May 16, 2014

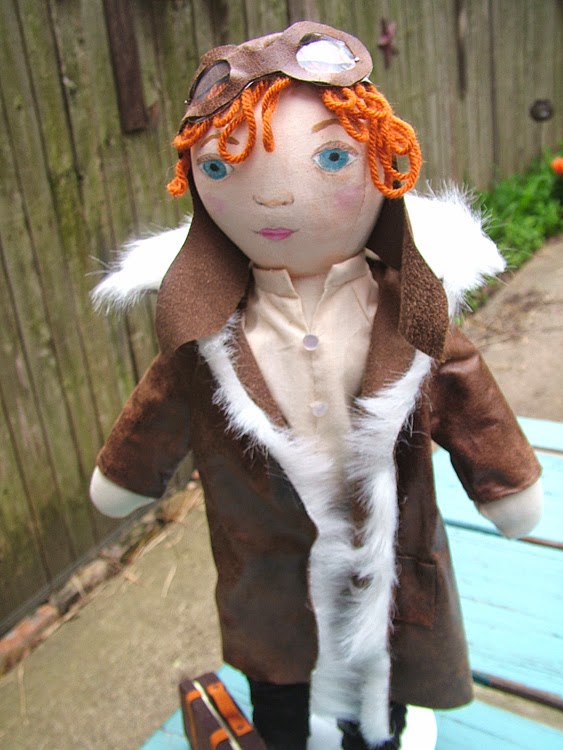
amelia earhart doll


This is a fun project for anyone who has ever wanted to engage in some doll making, but without making the doll completely from scratch. For me the, the most fun part about making a doll is to create clothes and accessories that will make the doll unique. Making the body is not something I have proven to be that talented at. So, lucky for me, I ran across this 18 inch cotton doll at the craft store many months ago. It cost $8. The doll is not particularly attractive but has bendable fabric limbs and happens to be the same size as the American Girl Doll, which wound up coming in handy because you can purchase clothing items that you don't want to sew. Aside from the actual American Girl store, lots of places sell knock off 18 inch doll clothing including Joann Fabric and Toys R Us.
First, decide what kind of doll you want to make. If it is a literary or historical figure you should pick some identifying items of clothing and determine what color hair and eyes the doll will need to have. The clothes that Amelia is wearing were sewn were from Simplicity Pattern 5733, which contains all the clothes patterns you would need for virtually any doll including a skirt, a blouse, a robe, a long coat, a short jacket and pants.
What our doll is wearing:
  • white blouse sewn from pattern with pearl buttons at neck
  • brown suede pants sewn from pattern
  • black scrunchy boots purhased in 18 inch doll section at Joann Fabric
  • Long jacket sewn from pattern using Pleather. I used only one layer of the jacket and instead of making a liner glued on long strips of fake fur along the collar and inside. The coat does not button or zip, it is just open.  
  • Suitcase made from an empty Altoid tin. I covered the outside in brown felt and put purple satin on the inside. I made some medals out of shrinky dinks to represent her French Legion of Honor and her Distinguished Flying Cross medal. 
  • Goggles- wait until the face is done so that you know how far the eyes are spaced. Then cut simple goggles out of Pleather, twice. Sandwich some clear plastic (i used transparency from a stationary shop) in between the Pleather and use Superglue.
  • Hat - there is a really great aviator hat tutorial here at thedeviantart site.
  • hair- I used orange yarn
  • face paint- acrylic paint.
After I dressed the doll in her clothes I ran into the dilemna of how to make her face and hair. For this I turned to my co-blogger Corinne. She is a talented painter and has some experience with dollmaking so she took over and made the face and hair. She painted a circle on the face using gesso then drew the features in pencil, then filled them in with acrylic paint. She made the hair curly by gluing the yarn in loops under the helmet. It might be possible to find orange yarn that is already curly but I had not found any so this worked great.
We really enjoyed making this doll, as we both are big Amelia Earhart fans. You may want to make a similar one or make one in homage to your own hero or heroine.


Tuesday, May 13, 2014

Recycled May Flowers

Pin It
April showers are supposed to bring May flowers. Here in the Midwest we have some tulips in our yard, but the terrible winter has delayed a lot of our Spring flowers. You can make these flowers in a few moments and transform your paper scraps into an adorable bouquet to tide you over until your garden blooms. This project originally appeared in the April issue of Kids Craft 1-2-3! 
Materials:
paper (I used a map, sheet music, and pages from a gardening catalog.)
stapler
glue
pipe cleaner
something for the center like circles of felt, buttons, circles of contrasting paper, pom poms

Steps
  1. Cut a piece of paper into a long rectangle. Try 4 1/2 x 12 inches or pick your own size.
  2. Fold the paper like an accordion with small folds.
  3. After the paper is folded up completely, staple at the halfway point and fan out the sides.
  4. Glue the sides open to make the flower.
  5. For the center you can do what I did and glue on a small circle of felt and a button on top of that. You also could attach circles of contrasting paper, tiny pom poms, or other center items. 
  6. I used tape to attach the back of my flowers to the pipe cleaners. You could also use a glue gun for a neater appearance.


Tuesday, April 29, 2014

Tiny British Phone Booth

Pin It
 Since we are often making things that reference our love of British culture (Sherlock Holmes pillows, a Ms. Marple room box, etc.) we decided that it was time to make a little phone booth. The phone booth is small enough so that it can rest on a desk top or be included in a railway scene or used for whatever you want! I used blank Shrinky Dink paper but you could also make a phone booth out of cardboard, fimo, or fabric. The directions that follow are to make it out of shrinkable plastic. One drawback of this is that you will not wind up with perfection. My phone booth is a little crooked and the edges do not line up perfectly. However the translucence of the plastic does make for a nice effect.
Materials
  • shrinkable paper. I used two sheets size 5 x 8 inches and had some scraps left over for future projects
  • thin black Sharpie
  • colored pencils
  • scissors
  • printout of a phone booth image, taken from directly in front, sized at 3 x the size you want the final phone booth to be  
Steps
  1. Work on the scratchy side of the Shrinky Dink paper. Trace 3 identical phone booth sides around the outside and where the windows will be and cut them out around the outside carefully.
  2. Use colored pencils to fill in color and accents like the gold crown at the top
  3. Write the word "telephone" backwards and trace that using the Sharpie. Fill in around it in white
  4. Leave the windows blank
  5. Trace the back. This fourth side will be solid red
  6. Trim the booths so the top edge does not curl out like it does in real life, or it will be hard to glue them together, Make a straight line on three of them. 
  7. Bake in the oven at 350' for 1-3 minutes. This is where you can run into problems. You want the pieces to curl up while they are shrinking then relax back to being perfectly flat. You may want to use a toaster oven for better control and bake one or two pieces at a time. Flatten them with a spatula once they have relaxed back down and are still pliable.
  8. After the pieces cool you can assemble them. Mine did not line up perfectly so I made a tiny box out of card stock and glued the pieces onto this.  
  9. Enjoy! Now you can make one in blue, write "Police Box" on it, and make the Dr. Who fan in your life very, very happy.


Pin It