Thursday, August 23, 2012

Little Bear's Chair

Pin It
Follow my blog with Bloglovin


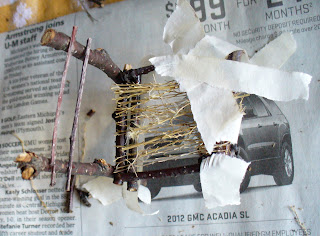
Corinne and I are making an entire Goldilocks and the Three Bears house complete with handmade rustic furnishings and pom pom bears. At least that is our plan. Right now I have a lot of materials that I have gathered this week in Northern Michigan and a chair and a half to show for my efforts. Making tiny rustic furniture is tricky! I can't give step by step directions because I suspect every chair I make will be very different, but here are some general guidelines.


First, collect lots of twigs. When I started, I gathered any twig I saw on the ground. The furniture made from this hodge podge looked sort of like Frankenstein with different colors and textures. Not good. So sort twigs by type of wood. There are lots of beautiful birch trees up here so I amassed a giant pile of birch twigs.
Second, use clippers to cut your twigs into manageable lengths. I made lots of small and medium straight pieces and a few curvy ones so they were on hand and ready to work with.
Third, decide what kind of glue you want to use. I used regular tacky craft glue. You might want to consider super glue as it might eliminate the difficult clamping positions I found myself in.
Fourth, lay out some chair parts like the back, the seat, the legs, and glue them separately. I used masking tape to hold pieces together or propped stuff up while it dried using anything I could find. Here I am using a box of paperclips to hold the front legs up while they dry.


In the next photo I am using masking tape to hold pieces onto Papa Bear's chair, which is still in progress.


I can tell there is a huge learning curve on this. There are excellent instructions on making a rustic heart chair at About.com. 
Coming soon: the beds!


Pin It

Monday, August 13, 2012

Back to School - Miniature Globes

Pin It


For some reason, we have a ton of those clear plastic balls, that "squinkies" come in, all over our house.
Forever I have been waiting for the perfect re-use of them to dawn on me,
when suddenly my kids became obsessed with globes. (Their dad does collect them)

So we have here, a globe of earth, and the all blue one, became the moon.
This was a very quick and satisfying project.


We made the blue moon, simply using a blue Sharpie marker. I thought we would be
able to color green continents on top, but it didn't work...so it stayed blue and became the moon, which I think is pretty cool.

The other globe, was painted light blue, with acrylic paint. It does need a few coats, as, the paint was difficult on plastic, but it did stay without too much trouble.
For the green, we again used the Sharpie marker, and just used a real globe as a  rough reference for where
to place continents.


The bases, were simply attached using superglue.
We used a metal washer piece on the Moon, and a wooden bead for the Earth.

These are going to be the smartest dollhouse kids in school!
In case you missed it, there was a tutorial for how to make the abacus a few weeks ago.


Pin It

Friday, August 10, 2012

Beach Rock Cave

Pin It


We have this jar full of rocks we have collected from the beach here around Lake Michigan.

My kids came up with this project totally on their own, after helping me to build
rock tables for our miniature greenhouse.

They decide to make a cave.

 
I was pretty impressed, because I hardly had to help them at all.
They figured out how to balance the rocks, and everything. (they are 4 & 6yrs old)

They made a pathway,and that thing on the far left is a mailbox.
And they even included a slide on the right side there.
The people they chose, a space ranger and some green lizard-y thing, make it all look very Star Trek to me, which is funny, but it reminds me that they
have lots of great ideas of their own, I just have to let them try them out.

Sarah and I both have kids, "in the city" but feel there are so many opportunities to bring nature into their
everyday play. It doesn't have to be complicated, just give them the materials and see what they can come up with.
 

Tuesday, August 7, 2012

Polka Dot Bakery


Pin It


I  went to a Barbeque last weekend and the hostess carried a big cardboard dollhouse out into the yard for some of the kids to play with. This group of socially awkward, clingy kids suddenly had a lot to talk about and it was a majorly successful icebreaker. My daughter has a huge Greenleaf dollhouse that weighs a ton and is not going to get carried in and out of the house at will. Ditto for my son's even heavier wooden farmhouse. I started thinking about making a small, lightweight dollhouse toy that we could take with us places like that barbeque or even when we go on vacation and leave the rest of our toys at home.

There is a site called The Pretty Penny that has really adorable kits so that you can make fabric fairy houses. I love these "wee folk dwellings" and suggest you check them out! I wanted to do something easier. I am reasoning that the structure itself is not as important as the cute things that go inside. Therefore I took a Hafflinger clog shoebox and a lot of odds and ends and made my bakery out of felt and glue and cardboard. I had a lot of different trim which came in handy to cover corners, window edges and door.  On the two smaller sides, I glued on decorative windows and did not cut them out. For the front I wanted actual see-through windows. I cut two squares out and a door. Then I glued pieces of plastic over the window holes. I used a presentation cover from Staples but there are probably lots of other sources for a square of plastic.

The side that opens has a loop of embroidery floss sewed to it so that it can close and latch onto a button sewed onto the top.

I made ample use of trims, ric rac, pinking shears and ribbon to hide the flaws and I think I cam up with a cute building. The inside is wallpapered with polka dot paper so I decided to call it the "Polka Dot Cafe."


Now for the fun stuff: the interior! Bakery shelves were assembled out of tiny thimbles (found at The Family Dollar) and microscope slides. I used superglue to connect them. You could put a third slide underneath to make your shelf steadier or just have it stand on the two thimbles. 

Fimo or Sculpey baked goods are fun for the whole family to make. The loaves of bread and hot cross buns were easy to make by mixing brown and white to get a nice bread color. We also made some cute trays of tiny cookies, and had mixed success with cakes and pastries.

The table is made of thimbles and a cork top from the awesome American Science Surplus store (where I also got the glass slides.) I glued the whole thing to a flat button so that it will stand up nicely. You also can buy the tables and shelves at our Etsy store.


Now you are ready to play with your bakery!


Please join us at our Tumblr page. We are a little late to the game but are finding it to be a really good vehicle for sharing our own dollhouse photos as well as pictures of other dollhouse art out there. Also you can submit pictures of your own dollhouse crafts to add to the mini blog!

Thursday, August 2, 2012

Back to School Mini Abacus

Pin It


We luckily still have another month until school starts at our house, but I know some folks who start back in just a few weeks. So depending on when your dollhouse kids start back to school, here are some ideas to think about for the coming school year.


Here we have an abacus. Made from popsicle sticks, wire and beads.

Now, most projects on our blog our geared towards activities you can make
with your kids, so I will be honest.  This project is probably best to make for
your kids, as it is complicated, and elicited quite a bit of cursing from me!
This might not be the case for you, as hopefully you can all learn from my mistakes
and make your tiny abacus without a single frustration.
First, take one popsicle stick, and cut it in half, right in the middle.
I then drilled 10 super tiny holes, with the tinest drill-bit we had, evenly down the length.

Then you get some wire, I used 20 gauge wire, which turned out to be a bit of a problem, so
I would suggest picking a higher gauge, thinner wire 24 or 26 should work much easier.
 (Higher gauge is thinner, lower gauge is thicker)
If you want to try and go ahead with 20, you can. Just learn from my mistakes and how to fix them!
.
                 I tied a knot at one end, pliers were required for this. Then strung it through the top hole,
near the rounded edge. Then I strung 10 beads onto the wire.
You will be making 10 rows of 10 beads. So you will need at least 100 beads
and about 25 inches of wire. Each row is about 1 1/2 inches wide.
Then sew the wire through the matching hole on the top of the other popsicle
stick. Clamp down the wire well, I used pliers, and try to keep your length even. (about 1 1/2")
The 20 gauge actually made it easier to hold the wire's shape, and not lose your length.
Then string it through the next hole, back and forth, adding 10 beads on each
row before you connect it to the opposite side.

All of the clamping and pulling with pliers on the soft popsicle stick, does take its toll,
so you have to be VERY careful.
Also be careful with the pliers, so you don't crack any beads. I cracked 3, this is when the cursing began.

I got about 8 rows done, it was looking pretty cute, when this happened.
The wood split right down the middle, from all the pulling of the heavy wire.
This is when I had to take a break! Time to put the kids to bed, and rethink this.

As I laid there with the kids, I figured out how to fix it. So I grabbed a glass of wine (another reason to make this on your own time!) headed back to the craft room and  I re glued the broken half back together
with wood glue. Then once the glue was set up, but still tacky, I very carefully snipped the
ends of the wires so I could stick them back through the still tacky, glued holes. There was one good thing about this, is it gave me a chance to replace the broken beads I had cracked and broke.
This took patience...lots of patience (and a second glass of wine). Leave as much length on the wires as you can, so none slip back out the holes.

Ah, by morning it was dry, and it seemed to work!
So, if you if you mess up as I did, and now have sharp edges sticking out,
you wait until all the glue is totally dry, then use pliers to fold down the
edges. Snip off the ends so they are as short as possible.
If you used a larger gauge wire, well then hopefully, nothing broke, and everything
looped through as it should and it looks perfect.
 Now, that bottom row should have lots of extra wire, as you see above.
 DO NOT CUT IT OFF,  you will need it.
You will need this extra bit of wire to make a base.

Take the wire and loosely loop it around, and thread it through
the bottom row wire's loop.

So, you should have created a half circle, that will hold the
abacus upright. Test it to see that it works before you twist the wire together.

Use some pliers to twist the 2 ends together, neat and tight.
If you use a larger gauge wire, you can may be able to twist this without
using tools.

Snip off the end of the wire with wire cutters.

I cut 2 pieces of fabric to cover up the messy sides. Just trace
the shape onto the fabric and cut to fit. I glued it in place with fabric glue.
It's a bit bumpy from the wires, but still, it looks better than the raw edge.

Yay, you are done, and your kids will be amazed at what you made for them!
Mine were amazed that the beads moved like a real abacus.


Tah dah!

Now we're all ready to go back to school!
I can show how to make the globes next week. They, on the other
hand, are very easy and kid friendly to make.

If you like what you see subscribe to our blog, over on the right sidebar, or by email. 
We are posting new ideas all the time!
You can also follow us on Facebook and Pinterest, and we love comments, suggestions and
 ideas from you guys!


Pin It