Pages
▼
Thursday, April 25, 2013
Friday, April 19, 2013
Traveling Circus in a Suitcase

When I was growing up our neighbors had an amazing collection of antique toys. The father was actually collecting toys he had owned or had wanted as a kid.
They had everything from an actual carousel horse to old tin wind-up toys and I loved going over their house to see these things. My favorite of all was this model miniature circus tent, in a room dedicated to circus memorabilia I was not allowed to touch it of course
but it was as big as a coffee table (at least in my memory) and I just loved
to look at it, and peer inside the tiny tent with trapeze artists flying through the air.
Sarah and I were discussing new projects to make, and we had been meaning to make
a circus, for some time. The only thing holding me back, was figuring out what to make it in.
Then it came to me, a suitcase! And I was ready to go, already inspired by the memory of that
toy circus!
It is small and portable, and opens up to an amazing little world inside full of talented
performers and animals just waiting to put on show.
Monday, April 15, 2013
Paper Mache Circus Animals

I have been working on a miniature circus, which you can see here.
I had it almost finished, but making the animals was holding me back.
Finally, I came up with a simple form in a paper mache style that seemed to work pretty well.
Using a 20 g. wire, and pliers, I made an armature for each animal.
I had it almost finished, but making the animals was holding me back.
Finally, I came up with a simple form in a paper mache style that seemed to work pretty well.
Using a 20 g. wire, and pliers, I made an armature for each animal.
Just sort of a line drawing in 3-D to hold the form.
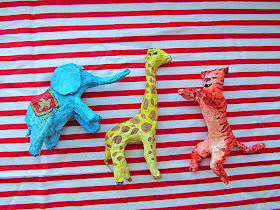
We have our elephant here.
a giraffe,
and a tiger, to jump through a flaming hoop!
Then, using tissue paper I had lying around, I stuffed it in and wrapped around
the shapes until they looked right, and secured with masking tape where necessary.
This sort of makes them look like poor little wounded animals in an
animal hospital, so let's fix them up quickly!
animal hospital, so let's fix them up quickly!
I used just what I had at home already,an made a sort of quick paper mache.
I tore strips of tissue paper ( used green b/c I was impatient, but white tissue paper would probably work best), and painted the surface under and over each layer
with a watered down white glue mixture. This takes about 24 hours to fully dry. When they do dry
they are lightweight but very sturdy, and ready to be painted.
I did apply one coat of white primer to them first, before adding color.
They just need some props!
The hoop was made from 20 gauge wire with felt flames glued on.Then I painted some old wooden bobbins I had for the base.
These bobbins came in handy. They also worked as stands for the
elephant and the performers.
You can see the finished Circus these animals belong to here!


