Pages

Tuesday, January 29, 2013

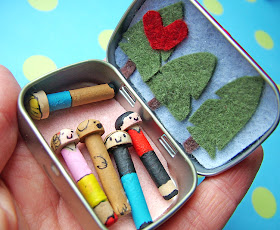
Tiny Portable Peg Family

Pin It
We travel a lot, visiting our family in Ohio. It is quite a long drive from Chicago,
but I have to say my kids have really learned to entertain themselves on this 5 + hour long drive. 
(either that, or we pull the video games and dvd player out! I have to admit it, we do that too!)
They have been doing it since they were babies.
What I have learned is, new things keep them happily entertained. 
This can get costly, right? So here is a very inexpensive and easy little toy, that will entertain them on those long car trips. Also good for Dr. office waits, restaurant waits...you name it. Pull this toy out, and 
you just may have some happy little people. (for a little while at least!)
Plus, it's so tiny, it takes up almost no space in your bag.
I modeled this one after my own family.
(l to r.) My son Simon, daughter Ava, our wiener dog Alice, me and my husband Paul.
This particular peg is my son. He is going to turn 5, just a few days before Valentines Day. 
This is very important to him, since his sister's birthday has fallen on Thanksgiving, and his Dad's on Easter.
Valentines Day is his day!
So this is both a Valentine gift, and birthday gift, that will be presented to him in the car on our way to Ohio!
His sister has already seen this, is already jealous, and has already stated she NEEDS one too.
Of course.
So I used the tiny altoid tin. Then purchased these tiny, tiny wood pegs from the craft store.
I had a different idea for them, that didn't work out, then realized I could re-use these....and boy have I! 
(Another post coming soon, with yet another tiny peg idea!)
I just painted very simple color blocked  shapes, and added detail with a good, fine point, black ink, rolling ball pen.
Add a scenic interior. I used felt and trees...since it seems that is all we pass on our 
way there. Not complaining, these trees have inspired many of my drawings!
I can't wait to give this to him, I think he'll love it.
-Corinne

Pin It

Monday, January 28, 2013

Tiny Valentine's Day Button Books


Pin It 
I love making tiny books. Valentine's Day is a good excuse to make some little books for my loved ones. I decided to use some scraps of craft paper than I have and then add a heart for each book. For my daughter I cut the heart out of old sheet music. My son the adventurer got a heart-shaped map. You may be using paper scraps like I am so don't worry about making your book a specific size.

Thursday, January 24, 2013

Mini Scout Sash

Pin It


Sarah found her mother's old scout sash, full of all the beautiful embroidered badges, and 
we were discussing how cute it would be to frame. Then of course it got us 
thinking about making a tiny version for the dolls, and well, framing that too!
So, I scanned in her mother's sash, and shrunk it down to make a tiny version for our tiny 
scouts. 

Thursday, January 17, 2013

Tiny Herbal

Follow


Pin It

We are reblogging this very old post because no one really noticed it the first time around and we think it deserves a second look. Also, Corinne is sick with a cold and she takes all of our excellent photos (the dark and blurry ones are all my work) so we are going to put a brand new post on hold till she is ready to take some excellent picutres of the tiny Amish quilts we are making.


I decided to add some books to our dollhouse library. I thought an herbal picture book would be perfect as it could have pictures of herbs that I like, and I wouldn't worry about text for this first book.
First, figure out what your cover will be made of. I used felt but faux or real leather would also be nice. Fell free to alter sizes. I will give you the measurements for the book in the picture.
 
  • Cut the felt into a 2 1/2 x 1 1/2 inch rectangle.
  • Glue a small rectangle of thin paper on to it.
  • Glue on 2 3-inch pieces of string.

  • Next make some blank pages for your book. These will be 2 1/4 x 1 1/4 inches. They should be on thin white paper except for one end paper which should be colored or patterned paper.


  • Now find some tiny pictures to add to your book. I used Google Images to find lots of herb images. Your rectangles will be folded in half to make two pages so make sure to locate small pictures.


  • Cut out your blank pages and fold the white ones in half. Leave the endpaper flat.
  • Glue your pictures into the book.
  • I used three pages. 
  • Stack your pages together with the colored endpaper facing up.
  • Use a sewing machine or stitch by hand right down the center.
  • Glue your end paper down on top of the felt.
  • Make a title and glue it on. I used Harrington size 8.


Thursday, January 10, 2013

Ice-skating rink from an altoid tin


Follow

Pin It
Using an old altoid tin, a magnet,  paperclip and my drawing abilities, I made this cute, portable little toy!


Using a magnet on the bottom, she really skates around the "rink".
My 4 year old son was so impressed by this, he couldn't believe I made it!
I love when I can impress my own kids, it's very rare!

Tuesday, January 8, 2013

Tiny Stained Glass Replicas- Featuring Wright and Sullivan

Follow


Pin It 
This is a very easy and fun way to make tiny stained glass windows. They would be good for a dollhouse or a model of a church or for jewelry or window hangings.
You need to start out with some stained glass windows to trace. What I did was visit Google Images and find some pictures to copy and print out. First I looked for "church stained glass" and found a panel that I liked. Then, since I am from Chicago, I thought of Frank Lloyd Wright and Louis Sullivan. Both men are most famous for their architecture but they also designed gorgeous windows for many of their buildings. There are a multitude of Frank Lloyd Wright images available online. You can also purchase or locate a Dover book that features his stained glass patterns. For Sullivan I found a round window from his Auditorium Theater to complete my trio of pictures.
I printed the images out (remembering that they would shrink about 40%) and used a black Sharpie to outline them onto plain Shrinky Dink paper. You color on the rough side of the paper so that the ink adheres. I then used colored pencil to fill in the spaces. I cut out each image. You may decide to reverse the images before printing them out so they will be facing the right direction when viewed at the end, assuming you view them through the clear side of the Shrinky Dink.


After tracing them I punched holes using a hole punch in the Sullivan and Wright ones. The religious one I left plain as I think I want to build a frame for it and mount it in my daughter's dollhouse. I followed the directions and preheated my toaster oven to 350' with a foil-covered tray inside while it was heating up. I then lay my little windows on the foil and watched them shrink. You are supposed to cook them with the colored side up. In a minute or two they are ready to be removed from the oven. You can tell because they will have curled up and then relaxed. The second you get them out of the oven, transfer them to a flat surface and use a rubber spatula or cutting board or anything to flatten them.You have only a few seconds to do this before it hardens. If it does not dry flat you can always soften it again in the oven and try again. I know many people have been making really cool Shrinky Dink projects for years, but I am not one of those people. We never had the blank sheets before and so we just colored in lame shapes from the kits and made little, ugly jewelry. I really enjoyed this project and look forward to many more.

Happy Birthday from a Tiny Elvis Fan

Pin It

Today is Elvis' Birthday! He would have been 78 years old. In his honor Corinne and I created a tiny Elvis fan's bedroom for this month's issue of  American Miniaturist Magazine. if you check out their downloadable issue you can get printable albums, items for the bulletin board, and details about the project.

Tuesday, January 1, 2013

Tiny Tibetan Prayer Flags

Follow

Pin It

I often hang a strand of Tibetan Prayer flags on my back porch. They are made of untreated cotton, block-printed with prayers and images.They weather in the sun and wind so they start out as vivid primary-colored flags and wind up shredded and faded. Here is what they look like, taken at the Field Museum Tibetan exhibit in Chicago yesterday. There are also a bunch of gorgeous shots of them in action on Google Images, cascading down mountaintops and off temples.


 I have always believed that the flags are supposed to be directing good vibes to my home: peace, kindness, strength, and wisdom. Or are they acting to protect my family? There are many interpretations of these Buddhist talismans.The five colors represent the five elements (water, air, fire, earth and wind.) They can be displayed vertically (Darchor) or horizontally. (Lung ta) I urge you to read further on the topic if you want to create your own mini flags, perhaps at The Peace Flag Project.

But I am digressing. If you want to know how to make your own flags please read on.


First you need to download the flag template. It is located at Google Docs. Print it out on fabric transfer paper. You can find this at office supply stores. You print onto the transfer paper then wait a 1/2 hour (yes, you do need to do this. I speak from experience.) You then iron it onto thin cotton. Your second choice is to use the imminently more excellent printable cotton and fabric that you can buy at Dharma Trading Company and possibly other places. I used the fabric transfer paper and it worked well but was pretty stiff. I wish that I had exercised some patience and ordered the softer, printable fabric. Maybe next time!


After you have ironed on the flags you are ready to cut them out.


Now you can glue them onto thread or embroidery floss or onto a toothpick if you want the vertical kind.

I built a simple triangular stand out of balsa wood.  My balsa wood stands were so light I wound up having to glue some sea glass onto them so they could stand up. You can probably think of other stands. you could use twigs or simply tie your flags between two objects. If anyone comes up with a better stand please share it with me.


Now you are ready to display your flags. You can bring some tranquility and prosperity to your desk, situate some in various window sills around the house, make a really long strand and run it up a banister, and so on. Happy New Year!


Pin It

Happy New Year!

Pin It
Hoping everyone had a great time welcoming in the New Year!


Here is a tiny chair from a champagne bottle, cork casing, to celebrate and commemorate 2013.

I have been wanting to try one of these chair, ever since I saw the post on Martha Stewart, here.

We have much more to come in this new year. 
Sarah already has a really cool post in the works as I type, so stay tuned!
Pin It